Showing posts with label lemon. Show all posts

Friday, January 20, 2012

Lemon, Rosemary, and Sea Salt Focaccia (Tiddly Pom)


Today it's sunny with a high of 72°F and a 20% chance (I'm a meteorologist now, look at that!) of a single cloud floating across the horizon. It's lovely. Yet... I can't help but feel a little empty inside. I miss winter.


When I was home in Maryland over Christmas it flurried. Once. I hurriedly rushed outside to capture this mythical and magical white stuff (Tucson legend has it that this is called "snow") falling from the sky with my camera. I was only wearing a t-shirt, but I didn't care. This moment was special, and becoming increasingly rare in my new life. Being away from something, someone, someplace can make us see just how beautiful the seemingly ordinary can be, and how we shouldn't take it for granted.


 I also couldn't help but think of A.A. Milne's poem from The House at Pooh Corner:


(Tiddly Pom)

The more it goes
(Tiddly Pom)
The more it goes
(Tiddly Pom)
On snowing.


And nobody knows
(Tiddly Pom)
How cold my toes
(Tiddly Pom)
How cold my toes
(Tiddly Pom)
Are growing.


The more it snows
(Tiddly Pom)
The more it goes
(Tiddly Pom)
The more it goes
(Tiddly Pom)
On snowing.


And nobody knows
(Tiddly Pom)
How cold my toes
(Tiddly Pom)
How cold my toes 
(Tiddly Pom)
Are growing.


We're not so unlike these flakes of snow: no two exactly alike; each our own shape and size, each our own unique journey from above -- Each step sounds a Tiddly Pom, each heart beats a Tiddly Pom.


This rustic, lemony, salty focaccia is perfect for a winter's day, even a pretend one. Fresh rosemary and good olive oil counter the burst of tart, citrus flavor, pleasing all of the tastes. I have a huge rosemary bush in my front yard, so every time I see a recipe with rosemary my eyes light up.


 I made some focaccia with tomatoes, too, since my roommate can't eat lemons. So, feel free to use the bread recipe as your base and flavor to your preference. I made these in four mini cheesecake pans as they were the perfect individual serving size, but you could also use two 8-inch cake pans for a larger focaccia.

Lemon, Rosemary, and Sea Salt Focaccia
adapted from Canal House Cooking, Volume No. 3: Winter & Spring

yields two 8-inch rounds or multiple mini rounds

Ingredients:
1 teaspoon active dry yeast
3/4 cup warm water
2 tablespoons extra-virgin olive oil, plus more for prepping pans and drizzling
1 3/4 cups break flour, plus more for kneading
2 teaspoons coarse sea salt
1 lemon
2 branches fresh rosemary, removed from stem and lightly chopped
freshly ground pepper

Directions:
For the dough, dissolve the yeast in 1/4 cup warm water in a medium bowl. Stir in remaining 1/2 cup water and 1 tablespoons of the olive oil.

Pulse the flour and 1 teaspoon salt together in the bowl of a food processor. Add the yeast mixture and process until a rough ball of dough forms, 1 minute. Briefly knead dough on a floured surface until smooth. Shape dough into a ball. Put 1 tablespoon of the oil into a large bowl. Roll dough around in bowl until coated with oil. Cover the bowl with plastic wrap and let the dough rise in a warm spot until it has doubled in size, about 2 hours.

Pour a thin film of oil into each of four 8-inch round cake pans. Divide the dough and put one piece into each pan. Using your fingertips, spread dough out in each pan. The dough is elastic and will resist stretching. Let it relax for 5 minutes or so after you've stretched it as far as it will go. Eventually, it will cooperate and fill the pan.

Preheat the oven to 450°F. Cover the pans with damp dishcloths and let the dough rest until it has swollen in the pans a bit, 30-60 minutes.

Uncover the pans. Sprinkle the dough with the rosemary. Using your fingertips, poke dimples into the dough in each pan, then liberally drizzle with oil so it pools in the hollows. Arrange just the thinnest rounds of lemon on top, drizzle with more oil, and sprinkle with remaining sea salt and freshly ground pepper. Bake the focaccia until golden brown, 20-30 minutes. Drizzle with more oil when you pull the focaccia from the oven. Serve cut into wedges.

Enjoy.
Pin It

Sunday, October 9, 2011

Hummus


Hummus. You've seen it at about every potluck/dinner party these days. You've probably bought a giant tub of it before. You've probably never made it yourself though, and lucky for you, it's super simple! You just chuck a bunch of ingredients into a food processor, and voila! you have a dip that deceptively makes you feel better about your hips than ranch dressing does.


I like to garnish my hummus with a drizzle of olive oil and either paprika or some sun-dried tomatoes, and serve with some cut up pita bread (that's on the list of things to bake!). But hummus doesn't just have to be an appetizer. You can pretty much spread it on whatever you like. I like to put it in my sandwiches and wraps for lunch.


This hummus takes five minutes to make, so try it out the next time that you have a party or want to switch up the lunch routine. And most importantly, enjoy.


Hummus

yields 4 cups

Ingredients:
2 16 ounce cans garbanzo beans, drained of liquid
3 tablespoons tahini
3 cloves garlic, minced or pressed
1/4 cup water
4 tablespoons olive oil
7 tablespoons lemon juice
1 teaspoon salt

Directions:
Place all ingredients in a food processor and blend until evenly mixed and smooth (about 3 minutes).

Place in a serving bowl and top with olive oil and other garnishes (paprika, sun-dried tomatoes, parsley, pine nuts, cumin, etc.).
Pin It

Tuesday, September 6, 2011

Strawberry Lemonade Bars

These little pink beauties are all that their name promises. Some how the proportions of this recipe are just so that the bars don't just taste like strawberry-flavored lemon bars, they taste like strawberry lemonade bars. Mmmmmmm...

The strawberry lemon filling will appear almost soupy when prepared but firms up quite nicely once baked. The original recipe actually called for raspberries, but I had a big supply of strawberries at the time (thanks Trader Joe!). I think blueberries and blackberries are a good compliment to lemon as well, and would make beautiful purple and fuschia colored bars...


I ended up splitting the recipe into two 8x8 pans. I took one into work, but am tempted to leave the second one at home... dangerous...


This recipe can be made at any time of the year if you use frozen berries instead of fresh-picked, but the flavors scream summer. Labor Day has come and gone, but it'll feel like summer here in Tucson until October... which means... I'll have to make these a few more times until then. Darn.


Strawberry Lemonade Bars
adapted from Annie's Eats

yields about 24-32 bars

Ingredients:
For the crust:
2¼ sticks (18 tbsp.) unsalted butter, at room temperature
½ cup sugar
2 cups all-purpose flour
½ tsp. salt

For the strawberry lemon layer:
3 cups sugar
1 1/3 cups all-purpose flour
3 tbsp. lemon zest
¼ tsp. salt
3 cups strawberries, fresh or frozen, thawed
6 large egg whites
2 large eggs
1 1/3 cups freshly squeezed lemon juice

Confectioners’ sugar, for dusting

*This recipe can be halved and baked in an 8 x 8-inch baking pan with a reduced baking time of 25-30 minutes for the strawberry lemon layer. 

Directions:
Preheat the oven to 350˚ F.  Line a 9 x 13-inch baking pan with parchment paper.  In the bowl of an electric mixer, combine the butter and sugar.  Beat on medium-high speed until smooth, 1-2 minutes.  With the mixer on low speed, mix in the flour and salt just until incorporated.  Add the dough to the prepared baking pan.  Press into an even layer over the bottom of the pan.  Bake for about 25 minutes or until light golden brown.  Remove from the oven, maintaining the temperature.

While the crust is baking, make the top layer.  Combine the sugar, flour, lemon zest and salt in a large bowl and whisk to blend.  Puree strawberries and press through a fine mesh sieve, mashing with a spatula, to extract as much juice and pulp as possible, straining out the seeds.  Add the egg whites and eggs to the bowl with the dry ingredients and whisk well to blend.  Whisk in the strawberry puree and lemon juice until smooth.

Pour the mixture over the crust and bake until the center is just set and not longer jiggles when gently shaken, about 35-40 minutes.  Transfer to a wire rack to cool to room temperature.  Cover and chill well in the refrigerator, at least 2 hours.  When ready to serve, use the parchment paper to lift the bars from the pan.  Place on a cutting board and slice into bars.  Dust the tops with confectioners’ sugar if desired.

Enjoy.

Pin It

Sunday, August 14, 2011

Lemon Hibiscus Sorbet

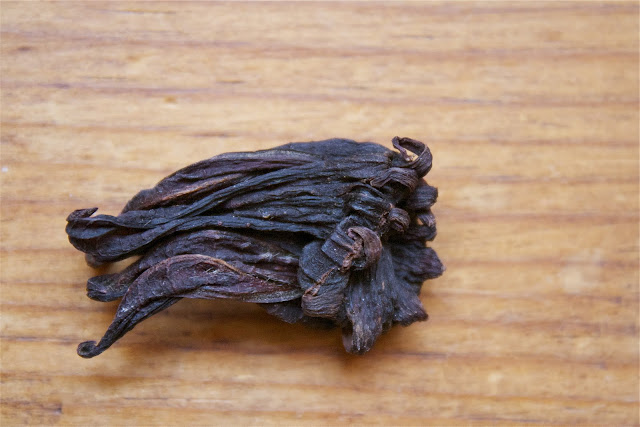
I live around the corner from a wonderful Chinese tea shop, Seven Cups. Yesterday, I was looking for a gift to give a fellow tea-lover, when I came across these dried hibiscus flowers. Pictured is Chinese hibiscus, but you can also find hibiscus flowers in Latin specialty food stores (usually in a bag labeled "Flor de Jamaica").

Hibiscus tea has tart fruity and floral flavor, and contains Vitamin C. An added benefit is that hibiscus tea has been linked in studies to reduce cholesterol and high blood pressure, so drink up! 

There's only one problem: my air-conditioner is broken. It's a summer's midday in Tucson. I don't want to drink hot tea. Solution? Lemon Hibiscus Sorbet.

This sorbet is delightfully light and refreshing, and has more depth of flavor than your average glass of iced tea. I cut back the amount of sugar in the original recipe because I really wanted the lemon and the hibiscus to be the stars. I found myself going back for thirds, so I think this recipe is a keeper. Lemon Hibiscus Sorbet is my perfect temporary relief from the sizzling summer.


Lemon Hibiscus Sorbet
adapted from Gourmet

yields 1 pint of sorbet

Ingredients:
2 cups water
1 cup dried hibiscus flowers
1/3 cup sugar
pinch of salt
2 tablespoons lemon juice
zest of one lemon

Directions:
Bring water to a boil in a saucepan. Add hibiscus flowers, remove from heat, and let steep for 15 minutes. (You could stop here and drink tea, but the sorbet is so good! I promise it is worth the wait...).

Pour the hibiscus tea through a fine-mesh sieve into a metal bowl and discard the hibiscus flowers (I find the flowers are good for another round, so NOW you can make some tea just to drink :) ). Return tea to saucepan and bring to a boil with sugar and a pinch of salt, stirring until sugar is dissolved. Transfer mixture to a metal bowl and place in freezer for 20 minutes.

Remove metal bowl from freezer, add lemon juice, and freeze in ice cream maker, adding the lemon zest at the last minute. Transfer sorbet to an airtight container and place in freezer to harden, for at least 3 hours.

Enjoy.
Pin It

Friday, August 12, 2011

Seahorses & Sea Scallops (Lemon Poppy Seed Sugar Cookies)

I miss the ocean. Don't get me wrong - the desert is full of beauty, and Tucson sure does know how to set a sun - but nothing quite beats a sea breeze rolling off from the seemingly-infinite, blue horizon...

I have one of those conch shells on my nightstand, and it teases me with the sounds of the ocean. So I was left no choice but to roll out my longing on a lightly floured surface, and squeeze out my wanderlust through a pastry bag. The result are these cute little seahorse and sea scallop cookies.


The base is a lemon poppy seed sugar cookie - a perfect flat canvas for whatever creation you have in mind. With plenty of lemon zest, this sand dollar packs a refreshing punch.

I've traded sand between the toes for poppy seeds between the teeth, but there are worse second-bests... I hope these cookies bring a smile to you, as they do to me :)


Lemon Poppy Seed Sugar Cookies
adapted from Martha Stewart

yields about 2-3 dozen cookies, depending on the size of the cookie

Ingredients:
1/2 cup unsalted butter
1 cup sugar
1 large egg, lightly beaten
1 tablespoon milk
1 tablespoon + 2 teaspoons lemon juice
2 tablespoons lemon zest
1/2 teaspoon pure vanilla extract
1 tablespoon poppy seeds
2 cups all-purpose flour
1/4 teaspoon salt
1/2 teaspoon baking powder

Directions:
In the bowl, cream butter and sugar with an electric mixer until fluffy. While the mixer is running, add the egg, milk, lemon juice, lemon zest, vanilla extract, and poppy seeds, and mix until well combined. Turn the mixer down to low and gradually add the flour, salt, and baking powder, and mix until just combined.

Transfer dough to a work surface. Shape into 2 discs, cover with plastic wrap, and refrigerate for at least 1 hour.

Preheat oven to 350 F. Line baking sheets with nonstick baking mats or parchment paper;.

On a lightly floured work surface, roll out dough to 1/8-inch thickness. Cut into desired shapes, and transfer to prepared baking sheets, leaving an inch in between. Leftover dough can be rolled and cut twice more. Bake until lightly golden, about 10 minutes, but do not allow to brown. Transfer to wire racks to cool.

Decorate with royal icing, if you fancy. Enjoy.


Pin It
Tuesday, December 21, 2010

Ciambelle (Lemon Wreath Cookies)

Christmas time is here! The ground is covered in snow, A Charlie Brown Christmas by the Vince Guaraldi Trio is spinning in the CD player, and the tree is decorated.

In my family, "Christmas" is also synonymous with "Baking" specifically Cookies. The house is covered with flour and frosting the days leading up to this beautiful holiday. So I invite you to join my family to live these cookie-filled moments with us. The first treat of the season is Ciambelle. 

"Ciambelle" in Italian can refer to any ring-shaped cookie, cake, or donut. In this case Ciambelle is a lemon wreath cookie, a buttery cookie base, covered in a lemon glaze, and decorated with nonpareils.

These flakey and flavorful cookies pair excellently with a warm cup of tea and are sure to become a Christmas classic, just like lights on the tree.


Ciambelle (Lemon Wreath Cookies)
adapted from Martha Stewart's Holiday Cookies 2010 Issue

yields 6 dozen lemon wreath cookies

Ingredients:
3 cups all-purpose flour, plus more for work surface
1 tablespoon baking powder
1 1/4 teaspoons coarse salt
2/3 cup granulated sugar
1 tablespoon plus 1 teaspoon finely grated lemon zest
1/2 cup freshly squeezed lemon juice (3 - 4 lemons depending on their size)
1 cup unsalted butter
3 eggs
1 teaspoon pure vanilla extract
3 cups confectioners' sugar
white nonpareils, for decorating

Preheat oven to 350F. Whisk to combine flour, baking powder, and salt in a bowl. Zest and juice lemons.

In a separate bowl, beat butter, granulated sugar, and zest with an electric mixer on medium-high speed until pale and fluffy. Add eggs and beat until incorporated. Add vanilla and 1 teaspoon of lemon juice. Reduce speed to low and gradually add the flour mixture until combined.

Scoop 1 tablespoon of dough and transfer to a lightly floured surface. Roll dough into a 4-inch rope. Bring ends together, overlapping slightly, and press together to form a ring.

Repeat with remaining dough. Transfer rings to a parchment-lined baking sheets, spacing at least 1 1/2 inches apart.

Bake for 9 minutes. Then rotate the sheet and bake for another 9 minutes or until pale golden on bottoms and around edges. Let cool completely on wire racks.

Whisk confectioners' sugar and remaining lemon juice until smooth. Dip top of each cookie into the glaze, letting the excess drip off.

Return cookies to wire racks, glazed side up, and sprinkle with nonpareils. Let dry completely. Cookies can be stored in an airtight container at room temperature for up to 3 days.


Pin It

Saturday, September 11, 2010

Cottage Cheese Pancakes with Lemon


It's the weekend, and you know what that means: pancakes. I'm not going to lie - I'm the kind of girl who likes to drench her pancakes in syrup and butter. However once I realized that the butter is a solid hunk in the freezer and the cabinets are bare of real maple syrup (once you've tasted the good stuff it becomes difficult to keep up strong friendships with Mrs. Butterworth and Aunt Jemima), I set out to make a different kind of pancake - one that didn't have to hide behind all that butter and syrup.

This cottage cheese (I know, I know... but it's delicious. If I hadn't told you, you wouldn't have known it was in there) pancake with lemon is perfection: airy, moist, and filling. It's a good thing I have roommates because I definitely would have eaten the entire batch. Going out on a limb and trying something new can yield good (and tasty) results. Lesson learned.


Cottage Cheese Pancakes with Lemon
adapted from Martha Stewart

yields one dozen pancakes

Ingredients:
3 large eggs
1 cup cottage cheese
1/8 cup granulated sugar
1/3 cup all-purpose flour
1/2 teaspoon baking powder
1/4 teaspoon ground cinnamon
pinch of salt
2 lemons (1 zested, 1 cut into wedges)
confectioners' sugar for dusting

Directions:
Separate the eggs. Lightly beat the yolks.

In a separate bowl beat the eggs whites until stiff, glossy peaks form.

Heat a griddle or skillet over medium-high heat. Stir together the yolks, cottage cheese, granulated sugar, flour, baking powder, cinnamon, and salt in a medium bowl. Whisk in one third of the egg whites.

 With a spatula, gently fold in the remaining egg whites.

Grease the griddle/skillet with cooking spray or butter; heat until a drop of batter sizzles upon contact. Pour about 1/4 cup batter per pancake onto the griddle/skillet.

Cook until the surface of the pancake bubbles and the edges are slightly dry (this takes only about 1 minute). Flip pancakes. Cook until undersides are golden brown (about 3 more minutes). Serve sprinkled with lemon zest and confectioners' sugar with lemon wedges on the side (they tastes SO GOOD if you squeeze lemon juice onto them). Start your day happy.


Pin It

What's Hot This Week?